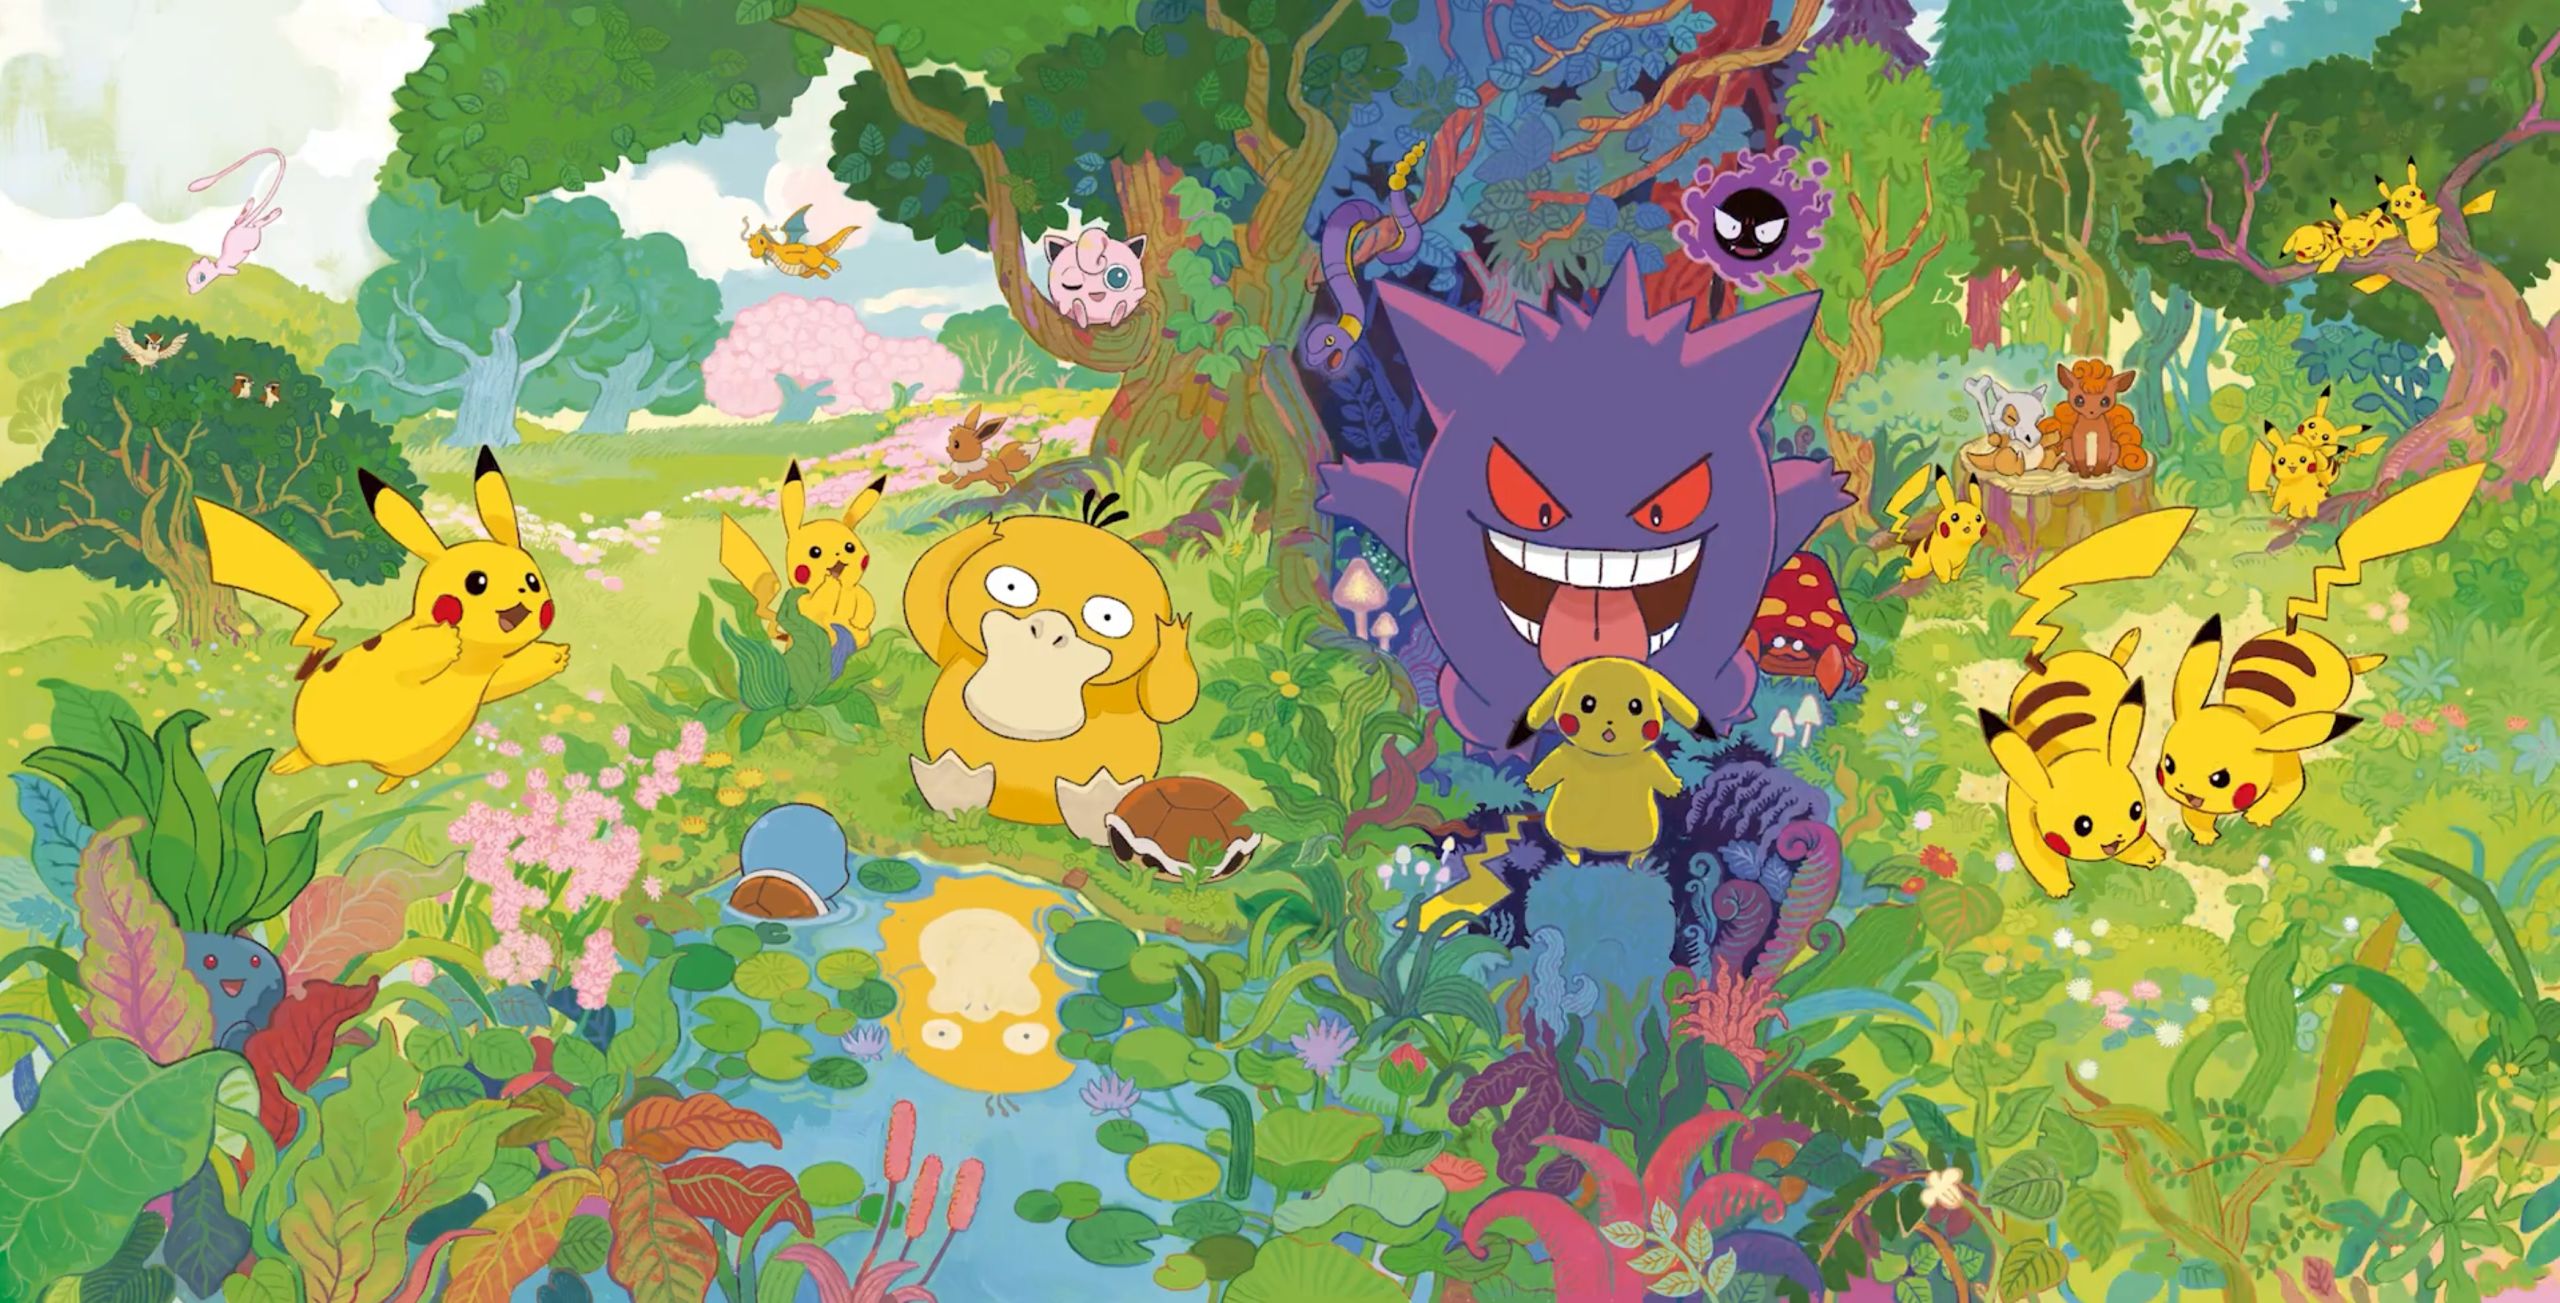
Everything You Need To Know: Original Partner Card Set Vol 1
And now for something completely different. Well… Technically, it’s still words and letters – but they’ve been arranged a little differently and are saying different things. Jump in and let us know what you think! Or don’t, that’s what’s so great about anonymous Internet engagements.
Each of the three regions have connecting artworks which showcase landmarks and items you would recognise while playing their respective games. *Saboteri is a Pokémon fan artist known for clean, expressive character designs and soft, stylized illustrations that give familiar Pokémon a playful, polished look.
Kanto Starters
Collector’s Tip: Pokémon Green was only released in Japan.
Bulbasaur (001/30th-P)
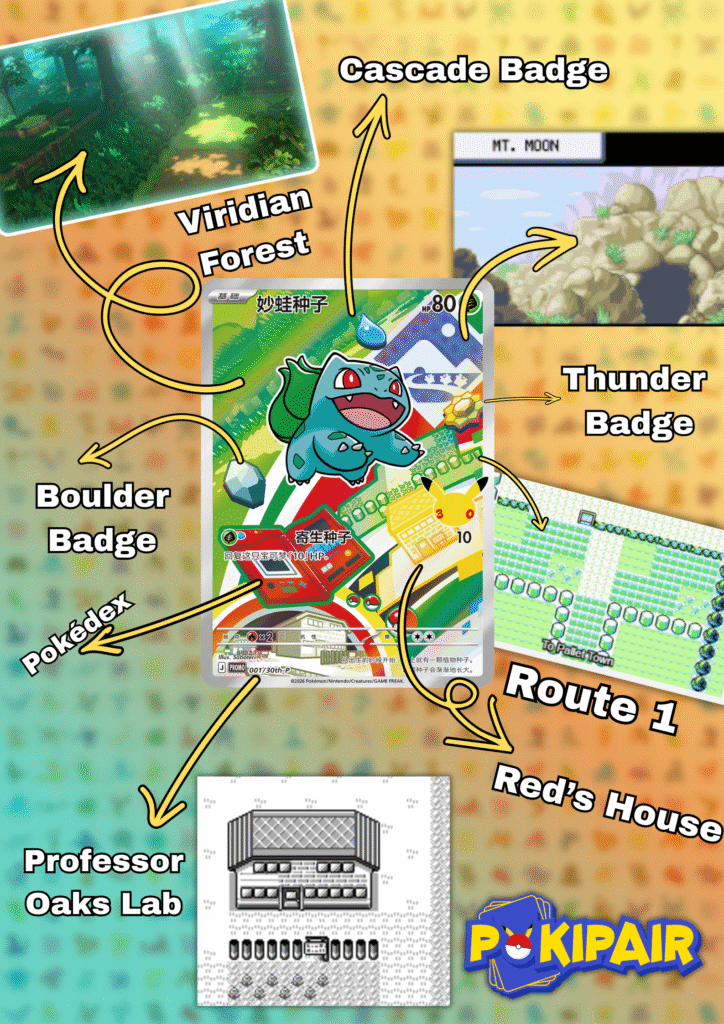
It’s only fitting we start off at the bottom right at Red’s House in Pallet Town. That’s your starting point in the game and where you get the classic mom send-off chat, and later the Running Shoes after your first rival encounter.
To the left of the card, sits Professor Oak’s Lab, marked by the Pokédex icon. This is where the journey properly begins: three Poké Balls on display for the starter choice, namely Bulbasaur, Charmander, or Squirtle, and of course the Pokédex handed over to kick off the whole “Catch ‘Em All” goal.
Who knew back then that this was all going to impact so many lives?
Route 1 (above Red’s House) is just above Pallet Town and is the first real grinding spot of the game. You’ll get sick of Rattata and Pidgey’s here (why is it always rats or crabs at the start of games)?!
The Boulder Badge (left side) is in Pewter City, where you challenge the Rock-type Gym leader, Brock.
The Cascade Badge appears in the middle top, which you receive after battling Misty in her water-type gym located in Cerulean City.
Collector’s Tip: In Pokémon Yellow, there is a house in Cerulean City where a girl named Melanie will give you a Bulbasaur if your friendship with Pikachu is high enough!
Charmander (002/30th-P)
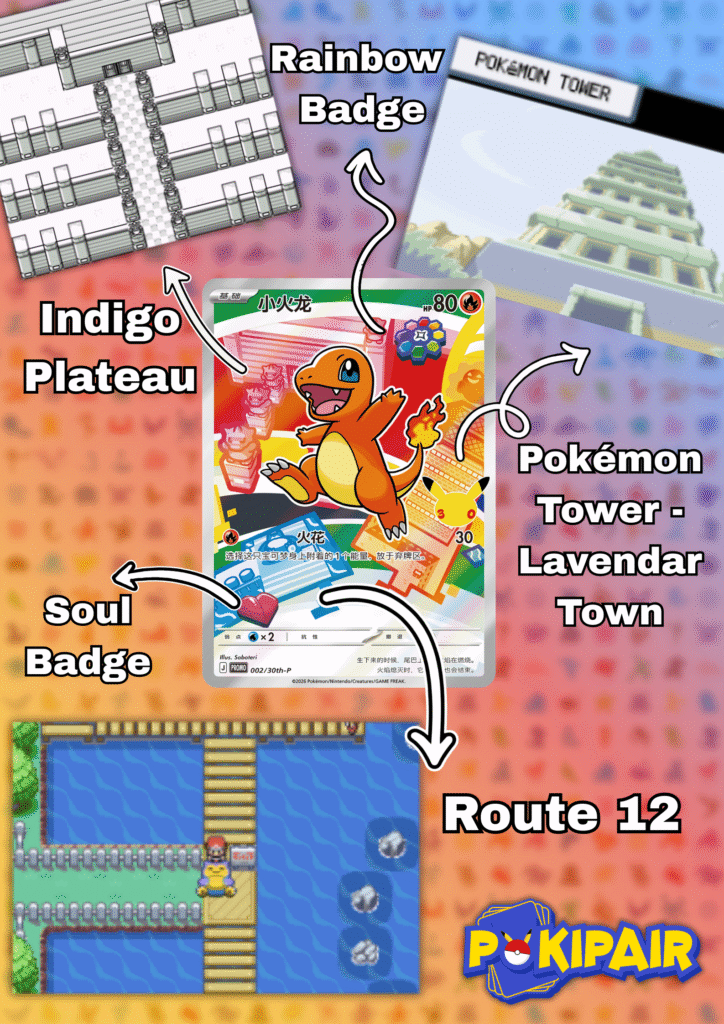
Route 12 anchors the bottom of the card. That’s the endless bridge south of Lavender Town, crammed with fishermen begging for battles. Snorlax snoozes right at the north end, blocking everything until you obtain the Poké Flute.
Soul Badge sits to the left. You acquire it from Koga’s poison-type gym in Fuchsia City, after surfing east from that very bridge.
Rainbow Badge pops up top right. Erika’s grass-types in Celadon City, smack next to the giant department store for all your shopping needs.
Collector’s Tip: Not card related at all, but more of a fun fact for Pokémon Yellow. It is the only game out of the four (Red, Blue, Green & Yellow) that you can travel with Pikachu outside the ball throughout the game. Which means you can reenact some scenes from the actual anime!
Squirtle (003/30th-P)
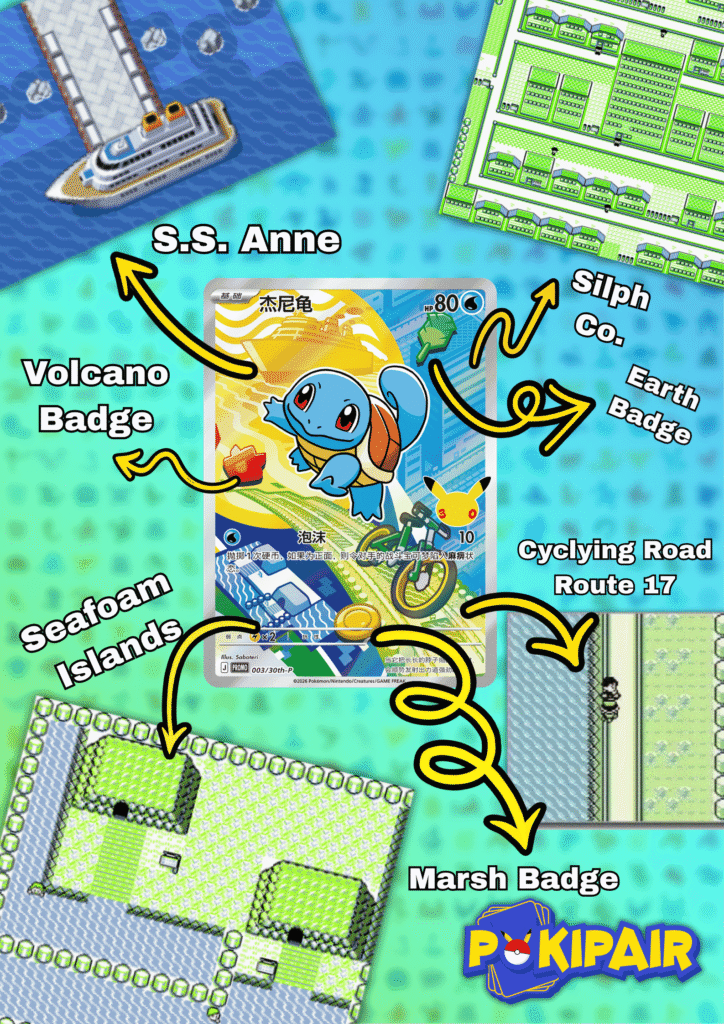
S.S. Anne sits pretty at the top left—that swanky cruise ship docked in Vermilion Harbor. Personally, we loved it when boarding that ship, as it meant we could finally start chopping down trees with the HM01 Cut after helping the queasy Captain!
Seafoam Islands claim the bottom left side. That’s the pair of watery caves east of Cinnabar where you push boulders with Strength to drain the currents and catch legendary Articuno deep inside.
Silph Co. fills the top right in Saffron City. It is one of the longest indoor areas in the game but is worth the time as you get that Master Ball once you defeat Giovanni!
Earth Badge digs in the top-right of the card. Giovanni is the Gym Leader for Viridian City and is the 8th and final gym leader.
Cycling Road and Route 17 cruise through the middle of the card. That epic bike downhill from Celadon—snag your Bicycle prize, evade biker gangs, and rocket to Fuchsia at warp speed. Nostalgia hits big time for us here.
Marsh Badge hangs bottom-centre. Obtain it by defeating Sabrina in her psychic-type gym in Saffron City. This would definitely be Quinton’s favourite Gym Leaders Pokémon line up.
Collector’s Tip: Right after that Thunder Badge in Vermilion (S.S. Anne gateway), pop into the house east of the Pokémon Center—Officer Jenny gifts a Lv. 5 Squirtle in Pokémon Yellow!
Sinnoh Starters
Collectors Tip: The Distortion World has no music at first… For a while, there’s just ambient noise. That was intentional to make players uncomfortable and disoriented.
Turtwig (010/30th-P)
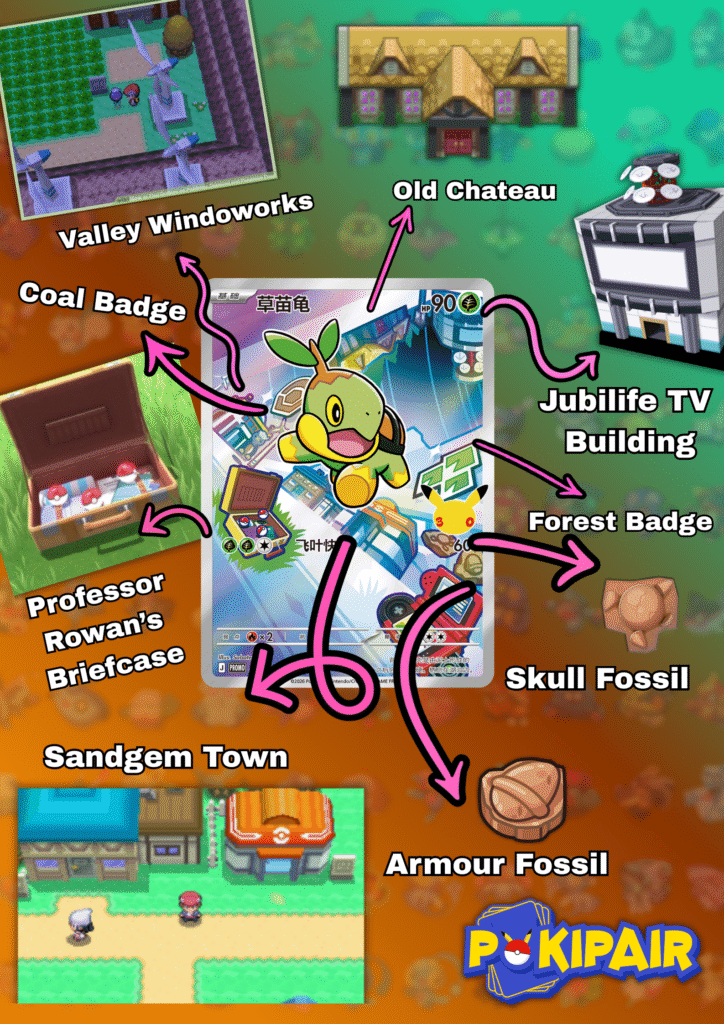
Starting us off, at the top right of the card is the Jubilife TV Building. Notably it is upside down… This is one of the first big hubs you reach after leaving Twinleaf Town, and where the game really starts to feel like a proper adventure rather than a small-town stroll.
Just to the left (or right) of that sits the Old Chateau in Eterna Forest. This eerie, abandoned mansion is famous for its ghostly encounters and one of the creepiest optional areas in Diamond, Pearl, and Platinum. If you ever walked through those rooms slowly expecting something to jump out… you weren’t alone. We still have trouble going to the bathroom at night!
To the top left sits Valley Windworks, Sinnoh’s wind-powered electric plant fuelling Floaroma Town—site of your first indoor Team Galactic raid, plus exclusive Friday-only Drifloon spawns outside from 10 A.M. to 4 P.M.
The Coal Badge peeking out from Turtwig, is earned after defeating Roark in Oreburgh City’s Rock-type Gym. This is typically the first badge most players collect in Sinnoh.
Professor Rowan’s Briefcase sits towards the bottom left. This is a fantastic nod to the very start of the game on Route 201, where you and your rival inspect the briefcase and choose your starter Pokémon after being attacked by a wild Starly.
At the bottom of the card is Sandgem Town, home to Professor Rowan’s Lab. This is where you officially receive your Pokédex and where your Sinnoh journey properly begins after you leave Twinleaf Town.
Next to it is the Skull Fossil, one of the two fossils you can uncover in the Sinnoh Underground. The Skull Fossil revives into Cranidos, exclusive to Pokémon Diamond.
Finally, the Armour Fossil sits at the bottom right. This fossil revives into Shieldon and is exclusive to Pokémon Pearl.
Collector’s Tip: If you dug up both fossils in the Underground with friends via local wireless, you could actually obtain both Cranidos and Shieldon in a single game — something not possible through solo play alone.
Chimchar (011/30th-P)
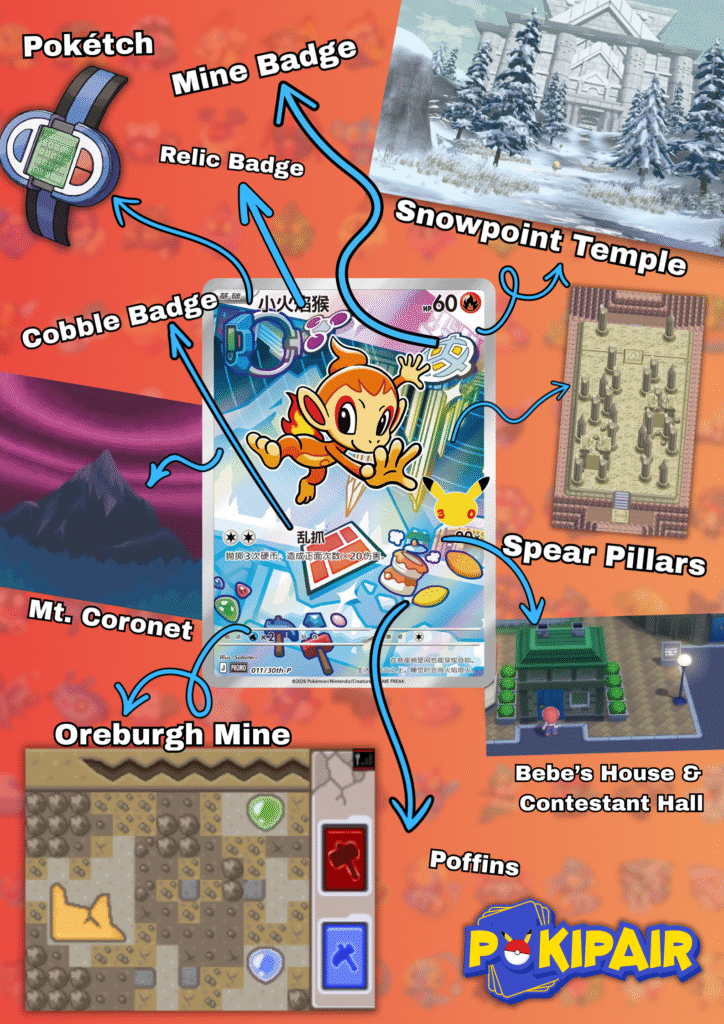
We’ll start off with the new feature added with Sinnoh region. The Pokétch– the dual-screen watch you receive in Jubilife City. Which lets you flip between apps like the calculator, friendship checker, daycare tracker, and of course, the Underground map.
Next to it is the Relic Badge from Gym Leader Fantina in Hearthome City.
Just under them is Mt. Coronet. This enormous mountain range splits Sinnoh in half and acts as a constant obstacle throughout the entire game, with multiple entrances, caves, and story events tied to it.
Snowpoint Temple is shown to the top right. This ancient structure is where you encounter the legendary Regigigas after transferring in Regirock, Regice, and Registeel from previous games. It’s one of the more mysterious and easily missed post-game locations in Sinnoh.
At the bottom left is Oreburgh Mine, where you first meet Roark before challenging his gym. The pickaxe, hammer and spheres are referencing the mining minigame!
Collector’s Tip: If you spoke to Bebe in Hearthome City with an empty party slot, she would gift you an Eevee — the only way to obtain one in Diamond and Pearl without trading. ** For those of you more skilled in the kitchen there are real life recipes for Poffins.
Piplup (012/30th-P)
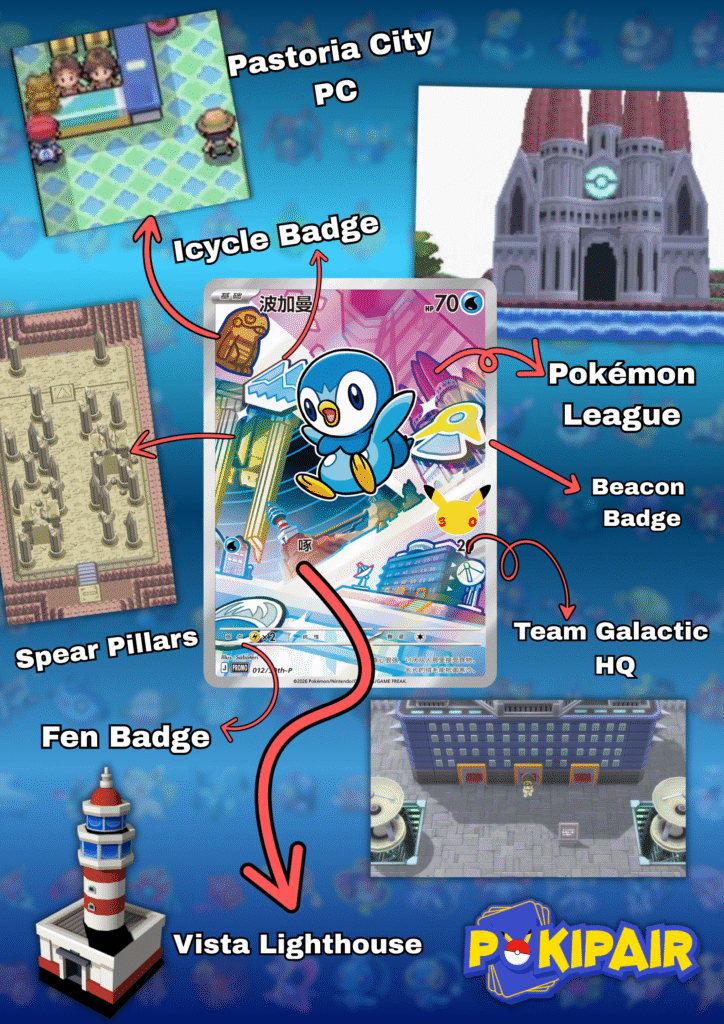
One of the first things we spotted on this card is the random Croagunk statue on the top left. In Diamond & Pearl you can find this statue in the Pastoria Pokémon Center. If you interact with it, the game notes that “even though it’s made of wood, it still seems like it’s seeping poison…”
Collector’s Tip: There’s also a small in-game Easter egg in Pokémon Platinum where, if you interact with the Croagunk image on a billboard or signboard in Pastoria and stand in a specific spot (like behind the “Croagunk face board”), a wild Croagunk will walk by and disappear into the Great Marsh.
Then below that, sits the upside-down Spear Pillars — same as featured on the Chimchar card.
The Fen Badge sits just below — earned from Pastoria City’s Gym under Crasher Wake.
The Vista Lighthouse and part of Sunnyshore City is showcased on the Horizon. In the games, you are able to view the Peakmon League from this location, and funnily enough, the Pokémon league is at the top right of this card…
Collector’s Tip: Despite being an evil team, they have a dedicated “Nap Room” with beds that allow the player to fully heal their party – which we can totally appreciate!
Alola Starters
Collector’s Tip: In Ultra Sun & Ultra Moon, Island Scan lets you catch the other two Alola starters wild.
Rowlett (019/30th-P)
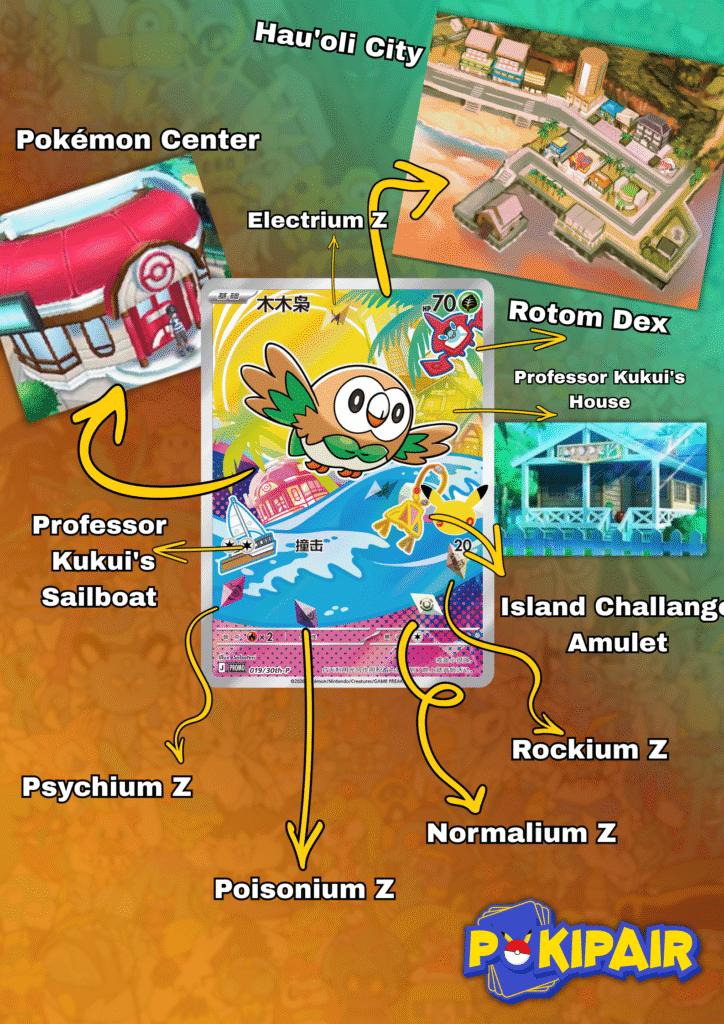
Hau’oli City bursts onto the scene as Melemele Island’s lively beachfront hub — your first real taste of Alola after picking your starter from Professor Kukui on Route 1.
Top-right of the card is the Rotom Dex — the sassy, shape-shifting Pokédex Kukui gifts you in Heahea City that becomes your trial guide, map, and resident comedian.
Collector’s Tip: In Ultra Sun and Ultra Moon, it gets a “Serious Mode” after certain story events and ditches the jokes.
Hanging just below Rowlett is the Island Challenge Amulet — Hala’s gift after your Iki Town battle with him.
Scattered across the card is the early-game Z-Crystal lineup:
- Rockium Z bottom-right (Olivia’s Akala grand trial reward)
- Normalium Z right side (Ilima’s totem battle prize in Verdant Cavern)
- Psychium Z bottom-left (Acerola’s ghostly Ula’ula trial crystal)
- Poisonium Z bottom edge (earned after beating Plumeria’s squad at Aether Paradise)
Collector’s Tip: Rowlet gets so comfy in tight, dark spots that it nests right inside its Trainer’s bag or jacket pocket—the ultimate literal “Pocket Monster”!
Litten (020/30th-P)

Our first stop is on the top left side – the Battle Royal Dome located on Battle Avenue. Here, trainers are able to battle it out in a 1v1v1v1 format.
Next door sits Kiawe’s House, based in Paniola Town.
The left side charges in the Poké Ride Tauros, your speedy bull mount.
Top-right features the Hano Grand Resort with its luxury pools. Fun fact; the name originates from the word Hanohano in Hawaiian which means glorious, magnificent, or grand.
Peeking out of the palm leaf is the Pokémon League, home to the Elite 4. Unlike the other regions, the Elite 4 is not made up of Gym Leaders, but instead composed of Kahunas and specialized trainers.
Shady House of Po Town lurks mid-right, Skull Gang’s graffiti-covered Ula’ula hideout.
Just in front is the Beast Ball, essential for snagging Ultra Beasts from wormholes.
Bottom-centre floats Aether Paradise, where the Beats Balls and the Pokémon Type: Null was created. It is definitely Pokémon’s most polite-looking villain lair.
Collector’s Tip: The Ultra Beast codename numbers (UB-01, UB-02, etc.) are scientific specimen labels, not Pokédex numbers.
Z-Crystal showcase lights up the card:
- Waterium Z left (Lana’s Brooklet Hill trial reward)
- Firium Z near Litten (Kiawe’s blazing Akala grand trial prize)
- Steelium Z top-right (Molayne’s Hokulani steel trial crystal)
- Fightingium Z bottom-right (Hapu’s Poni grand trial fighter)
- Grassium Z far-right (Mallow’s Lush Jungle grass haul)
Collector’s Tip: Litten torches its own body twice a year to burn off old fur and regrow its coat.
Popplio (021/30th-P)
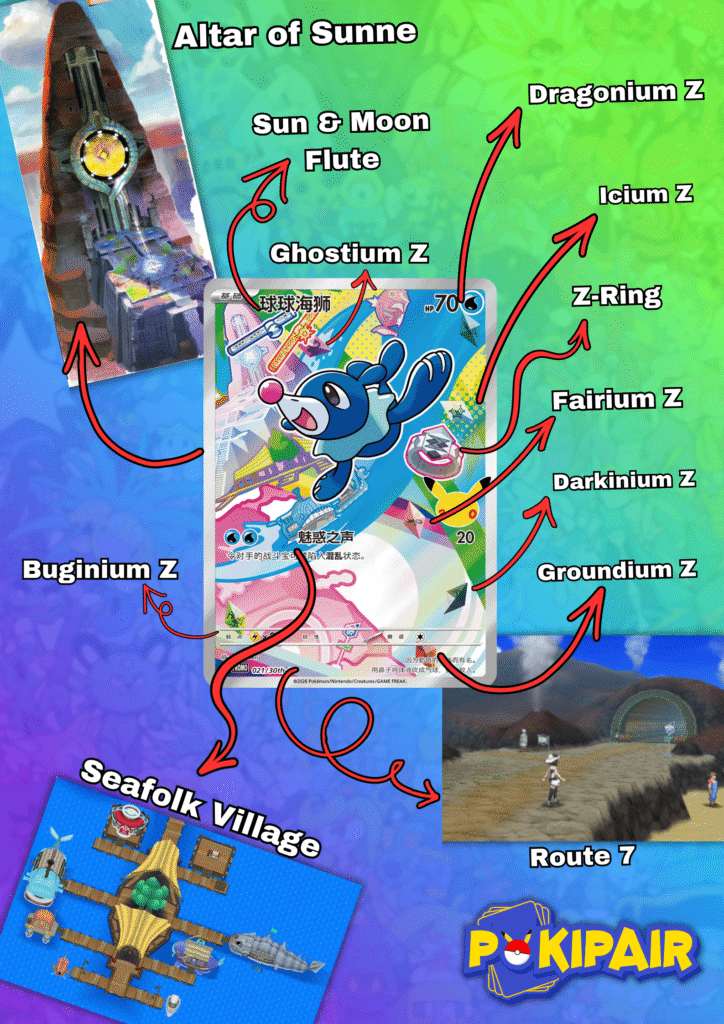
Seafolk Village dives in bottom-left as Ula’ula Island’s quirky spot. It’s inspired by the real- world Bajau sea nomads of Southeast Asia who live their whole lives on boats.
Top-left towers the Altar of the Sunne, that ancient Exeggutor-guarded ruin on Poni Island’s
Vast Poni Canyon — key to summoning legendary Solgaleo in Sun (or Lunala in Moon) after collecting both Sun and Moon Flutes.
Right beside it is the Sun & Moon Flute, the golden duo you assemble from island trials.
Nearby sparkles Ghostium Z, Acerola’s spooky trial reward from the abandoned Thrifty Megamart.
Bottom-right stretches Route 7, the coastal path that connects Royal Avenue, Wela Volcano Park and Route 8 together.
Collector’s Tip: A fan-favourite theory is that Popplio perfectly mimics the alchemical symbol for mercury while standing tall with head up (water’s element)—a sneaky design trio with Litten’s sulfur (fire) forehead and Rowlet’s salt (earth) wings!
It’s not a simple task capturing the feelings and emotions from these adventures in a single image, but we feel this is a close as you’re going to get. Right, time to dust of that old Gameboy, where did we put it…